
Overview
This guide provides a comprehensive, step-by-step walkthrough for instructors to create and publish courses on the Kalpla platform. It covers the complete course creation process, from logging in and setting up a new course to adding modules, lessons, and assessments. By following the instructions in this guide, instructors can efficiently build, configure and submit a fully structured course that is ready for student enrollment.
1. Login
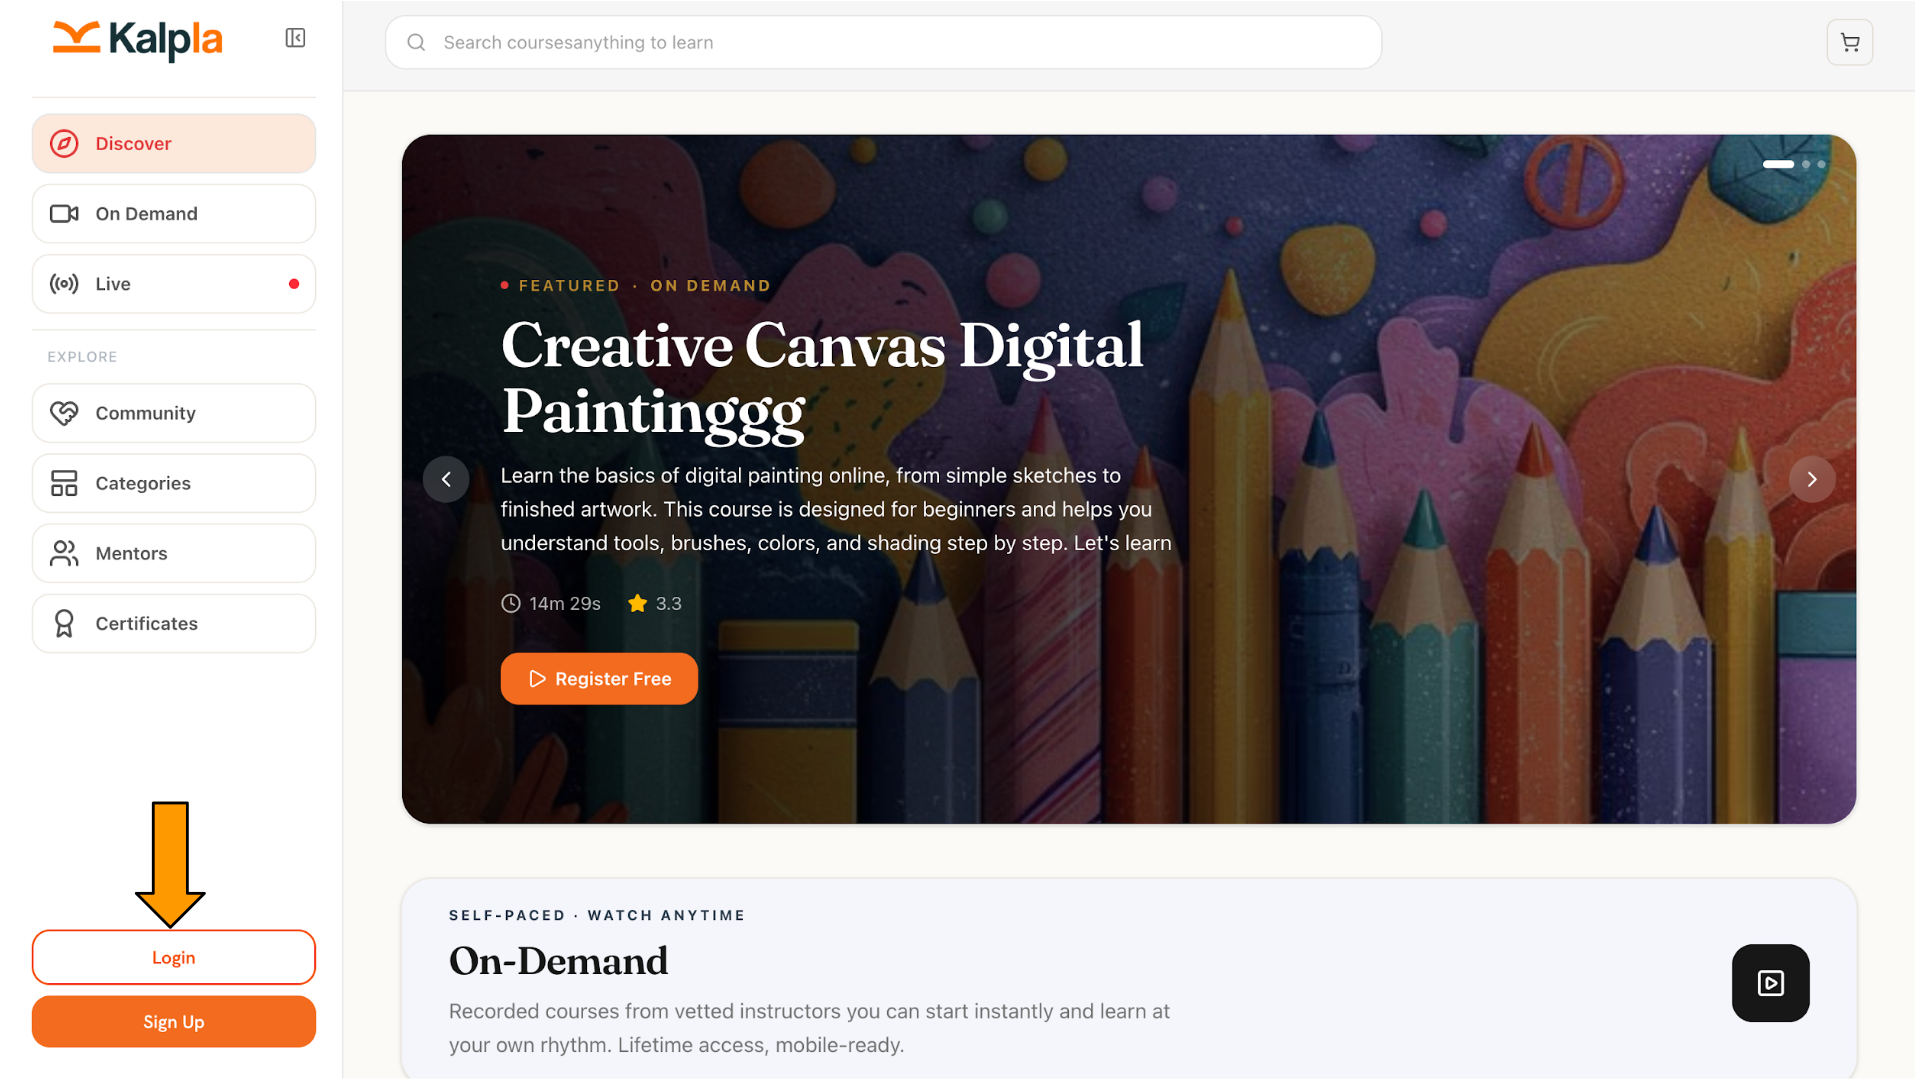
- Click on Login
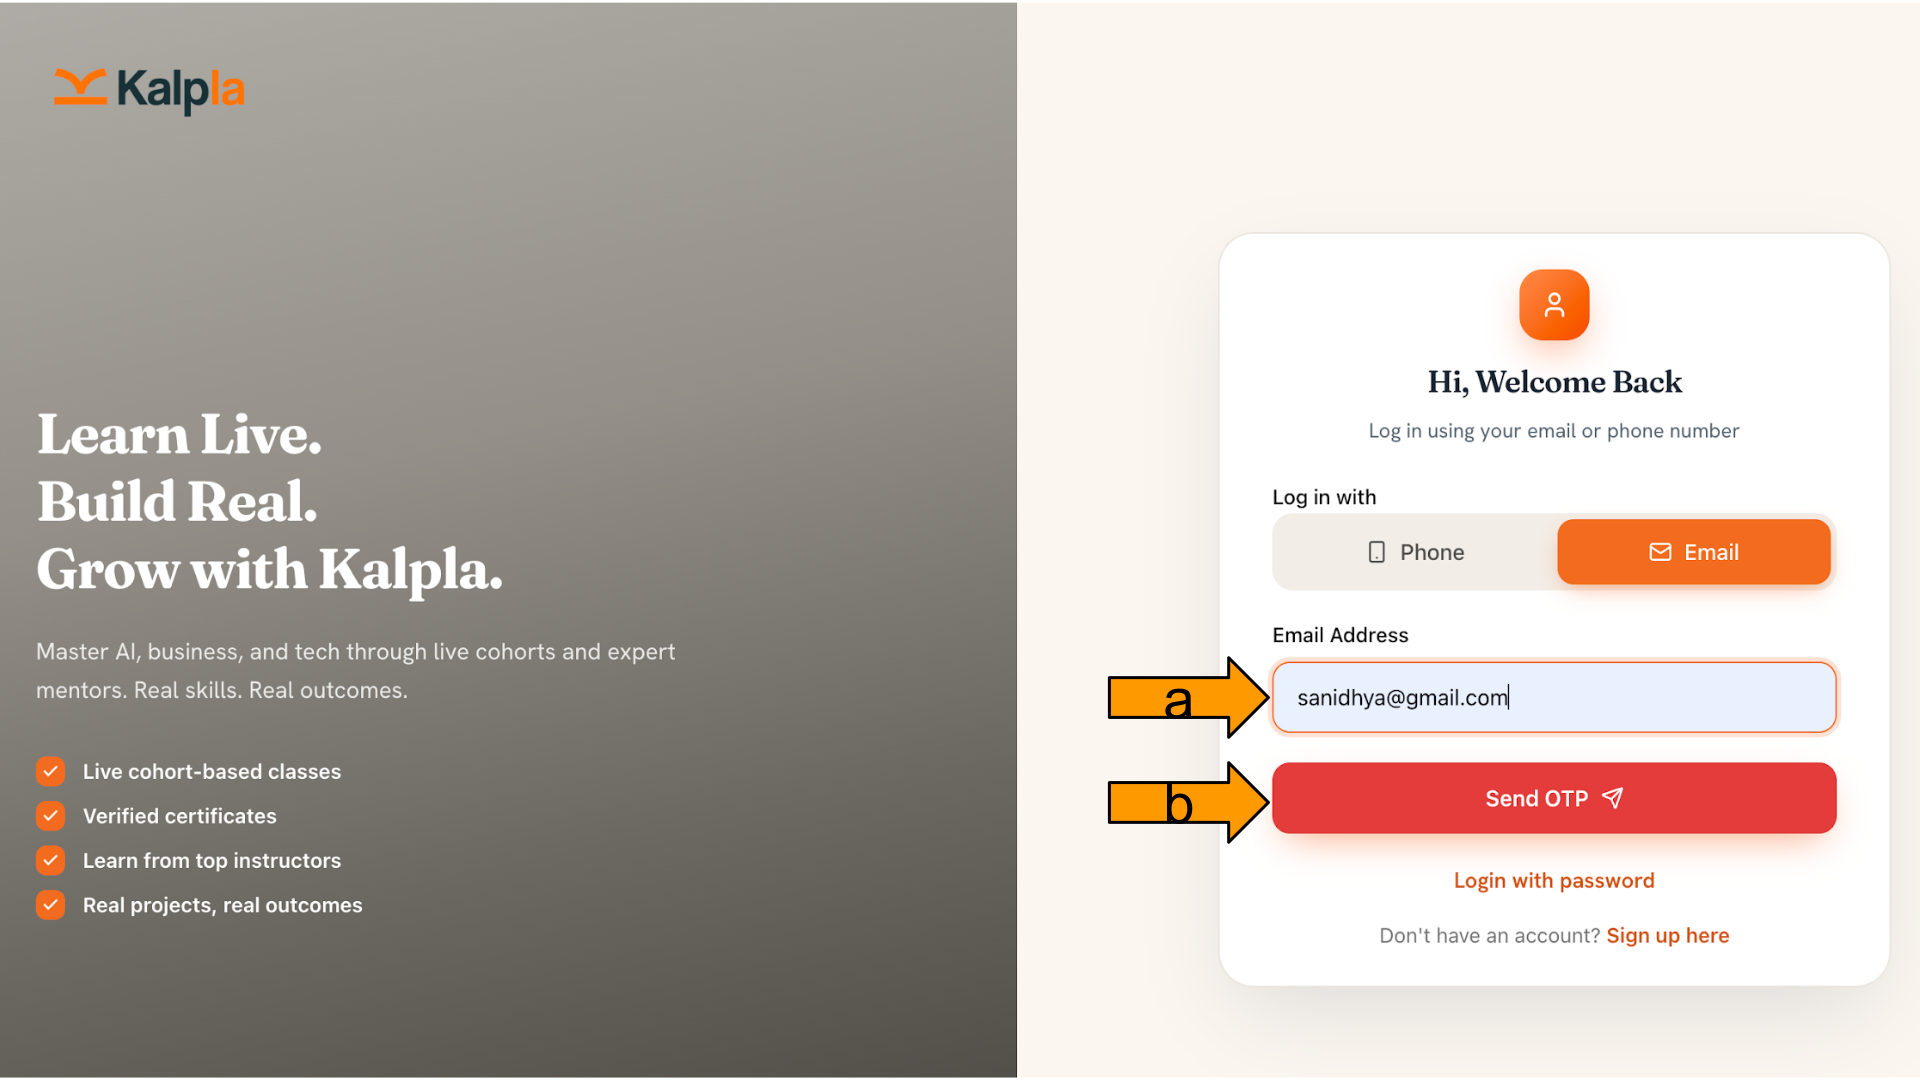
a. Enter the phone number or e-mail address.
b. Click on Send OTP.
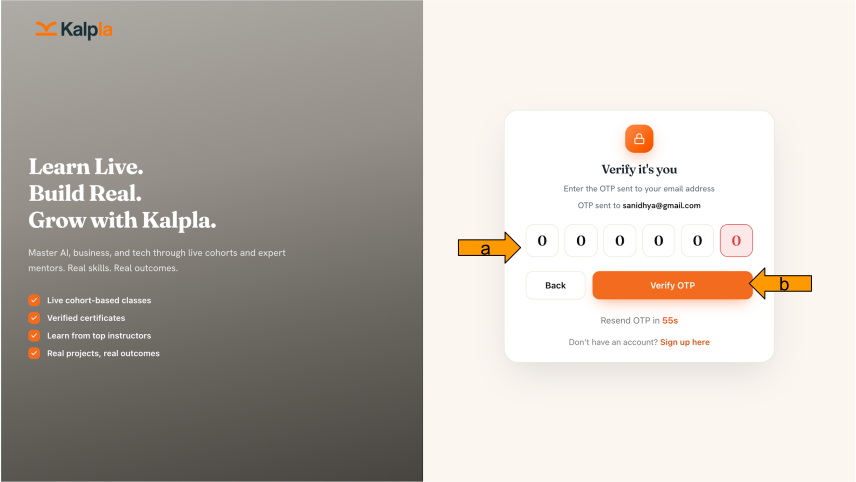
a. Enter the OTP.
b. Click on verify OTP.
2. Create a Course
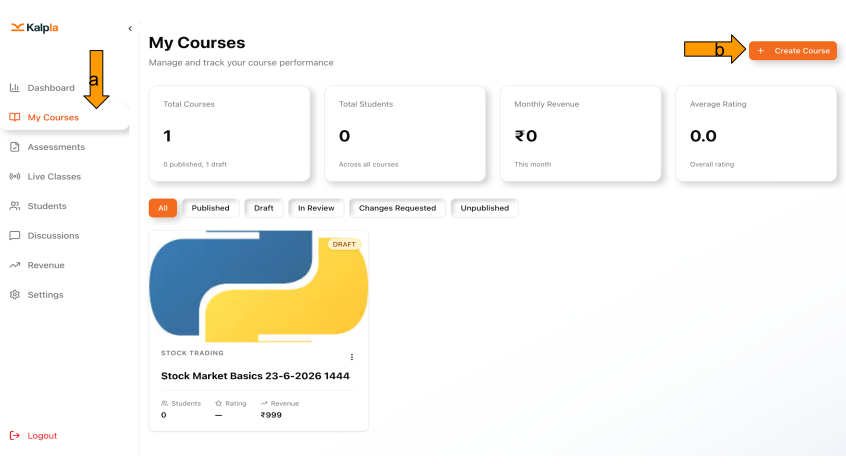
a. You will then be redirected to the dashboard.
b. From there, click on My Courses, and then click on Create Course.
3. Enter Course Details
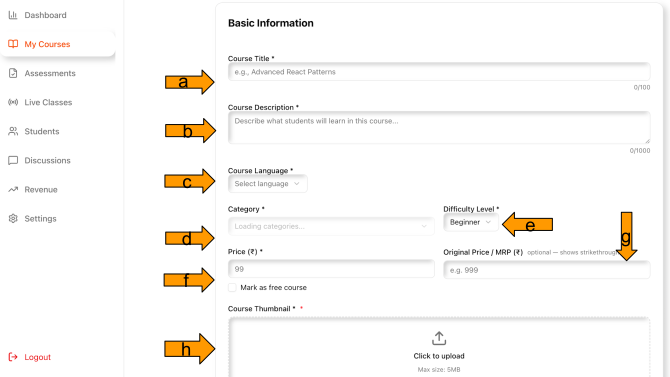
- Then, you will be redirected to the Create New Course page. There, enter the required details.
a. Course Title: A course title is the name of a course. It is the first thing learners see and should clearly indicate what the course is about.
b. Course Description: A course description is a brief summary of what the course is about. It explains the topics covered, what learners will gain, and why the course is valuable.
c. Course Language: A course language is the language in which the course content is delivered.
d. Category: A category is the main subject or field under which a course is classified.
e. Difficulty Level, then enter the Price and Original Price.
f. Original price: This is the "strikethrough" price shown to learners, giving the impression of a higher value.
g. Price: The actual selling price that learners pay. This is what gets charged at checkout.
h. Upload a thumbnail (MAX size 5MB).
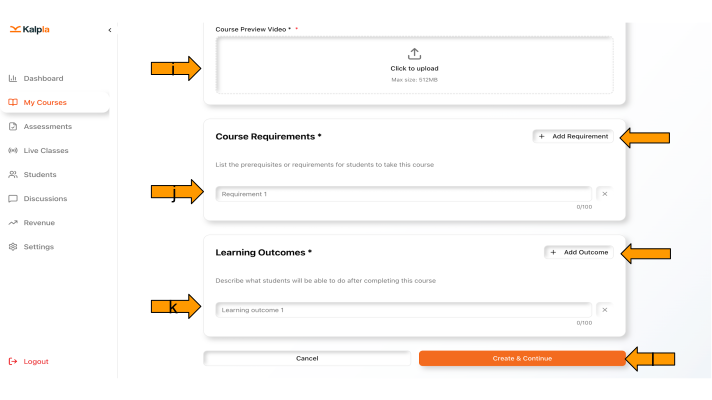
i. Upload course preview video(MAX size 512MB).
j. Add the Course Requirements. Course requirements are the basic prerequisites needed before taking the course, such as "A basic understanding of the subject."
- You can add more requirements by clicking on Add Requirement.
k. Now, enter the Learning Outcomes. Learning outcomes describe what learners will be able to achieve after completing the course.
- You can add more outcomes by clicking on Add Outcome.
l. Click on Create and Continue.
4. Review Course Details
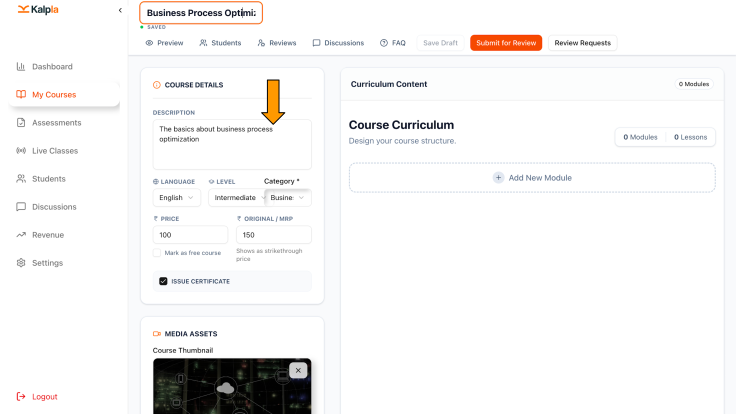
- After clicking on Create & Continue, you will be redirected to the Course Details page. Here, you can view the details you entered.
5. Add Course Modules
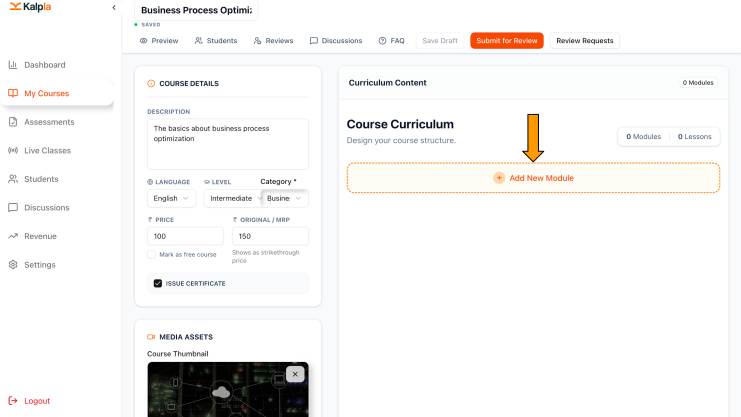
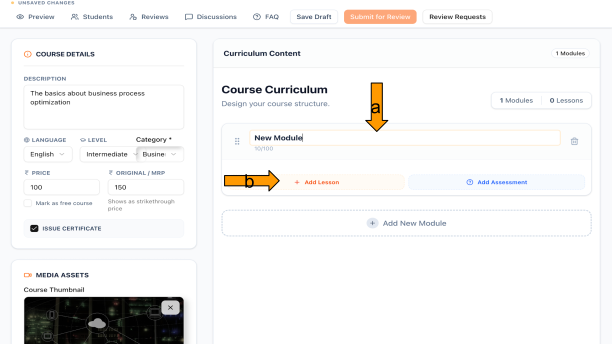
- Click on Add New Module to add modules.
6. Rename the Module
a. Here, you can edit the module name. You can also add more modules by clicking Add New Module.
b. Click Add Lesson to add lessons to the module.
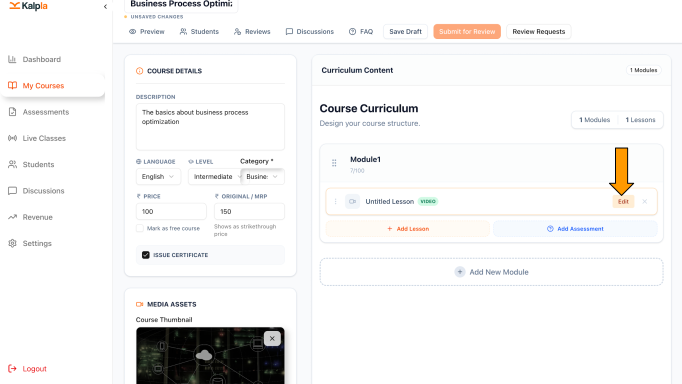
7. Add a Lesson
- After clicking on add lesson, you will see an untitled lesson. Click on edit.
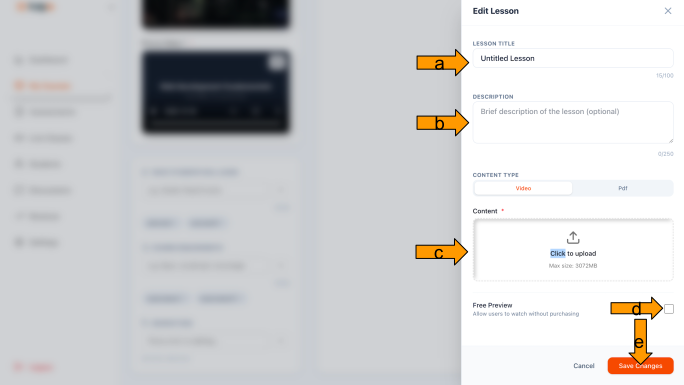
8. Edit your Lesson
a. Here, edit the lesson title.
b. Enter a description for the lesson.
c. Upload the content. The content can be either a video (maximum size: 3072 MB) or a PDF (maximum size: 50 MB).
d. You can also enable Free Preview, which allows users to watch the lesson without purchasing the course. After making the necessary changes.
e. Click on Save changes.
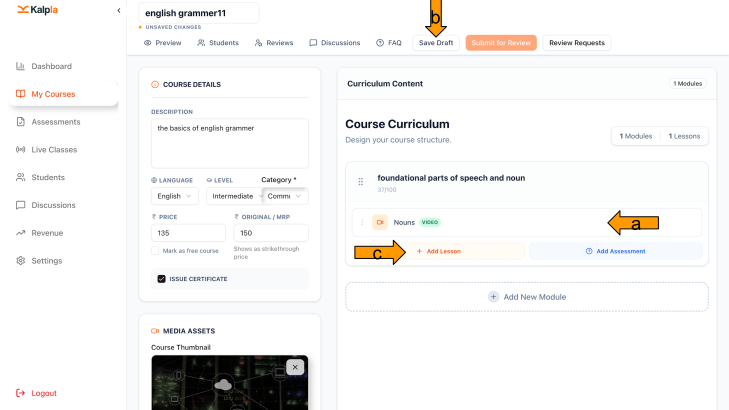
9. Save/Add More Lessons
a. Once you click on Save Changes, your lesson will be displayed.
b. Click on Save Draft.
c. You can add more lessons by clicking on Add Lesson and following the same procedure.
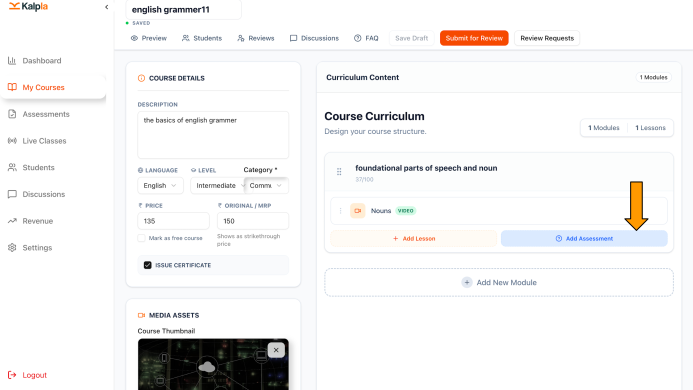
10. Add Assessments
- To add an assessment to that particular module, click on Add Assessment.
11. Add Assessment Details
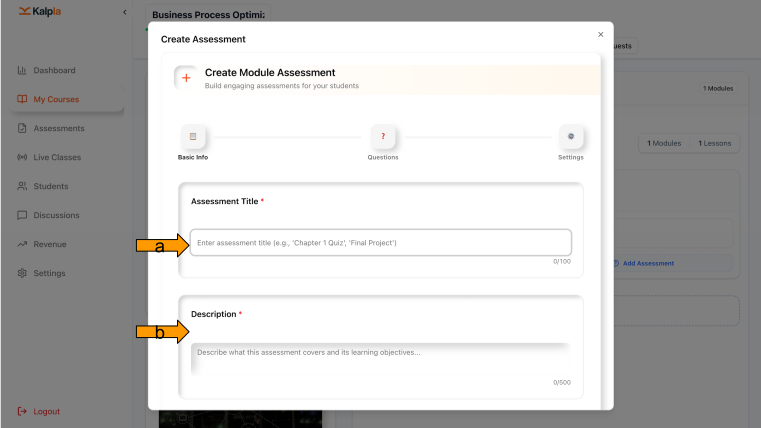
a. After clicking on Add Assessment, the Basic Info page will open. Enter the assessment title
b. Enter description.
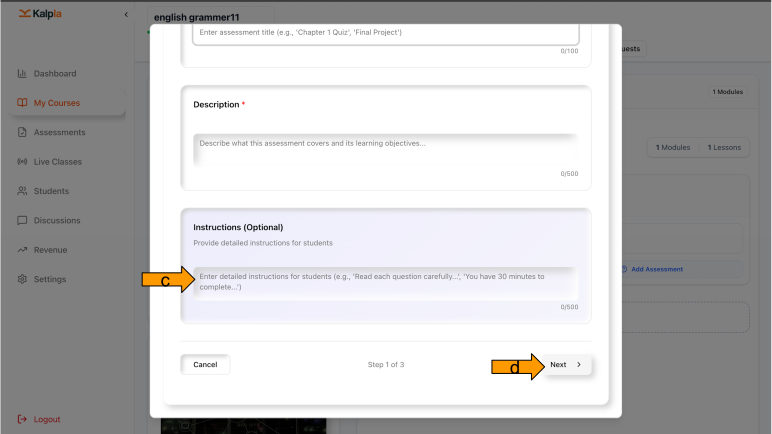
c. Providing instructions is optional you may choose to include them or leave them blank.
d. Click Next.
12. Add Questions
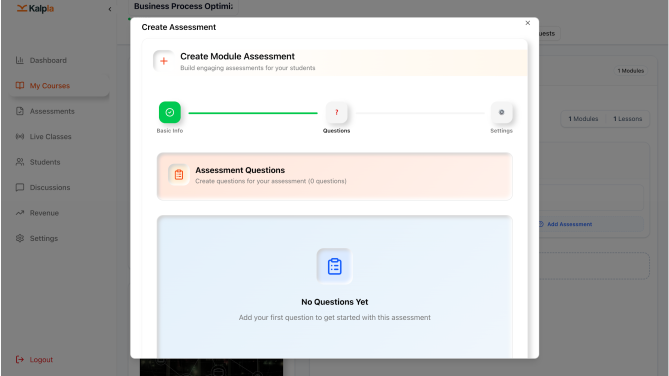
- Next, you will be taken to the Questions page.
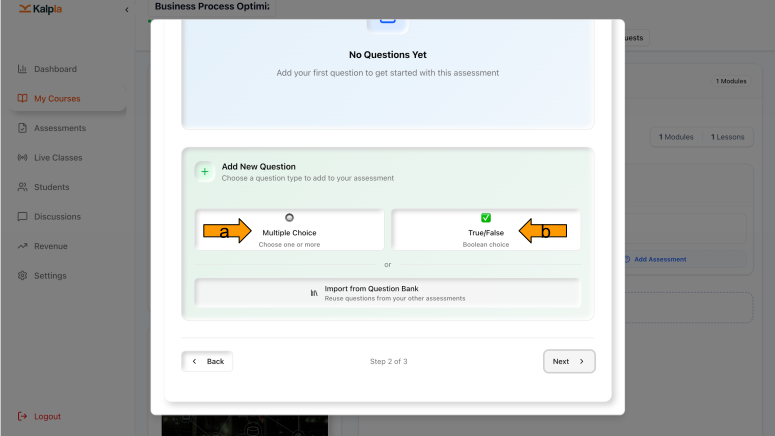
13. Choose Question Type
a. On the Questions page, you can choose either Multiple Choice
b. Or True/False questions.
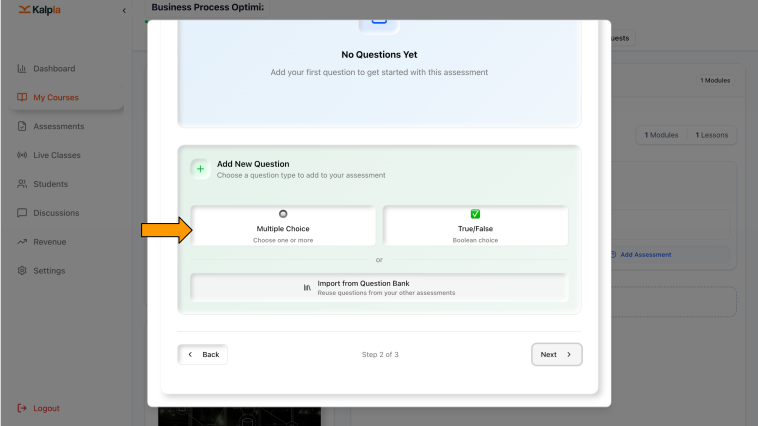
14. Add Multiple Choice Questions
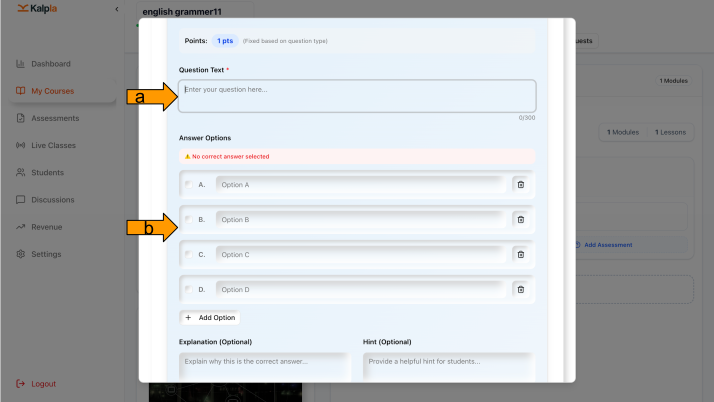
15. Enter the Question and Answers
a. Here, you can add your question in the Question text box.
b. Under Answer Options, enter the different answer choices for the question, and then mark the correct answer.
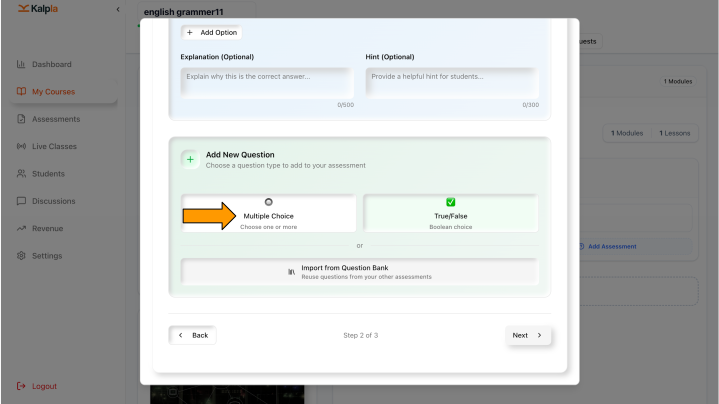
16. Add More MCQ Questions
- To add more multiple-choice questions, click on Multiple Choice again and add the questions in the same way.
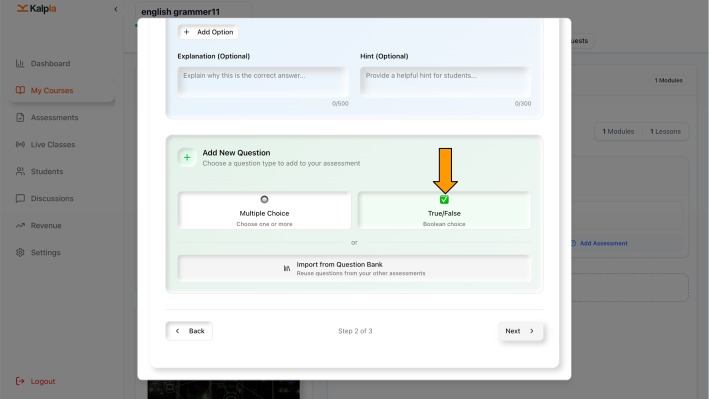
17. Add True/False type Question
- To create a True/False question click on True/False.
18. Enter the True/False Question
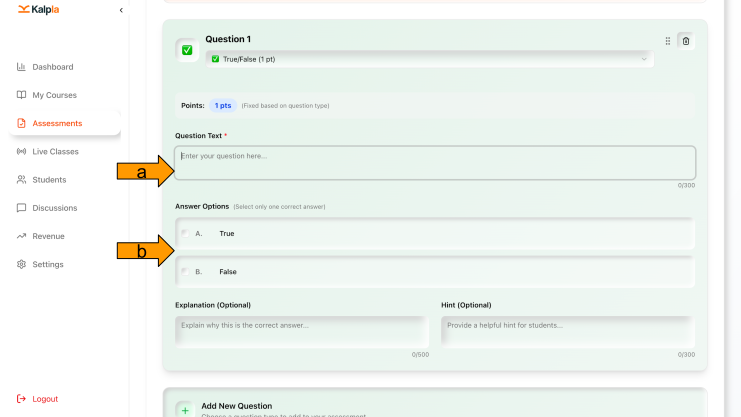
- Now, you can add your questions here.
a. Enter your question in the Question text box
b. Mark the correct answer. To add more True/False questions, click on True/False again and add the next question.
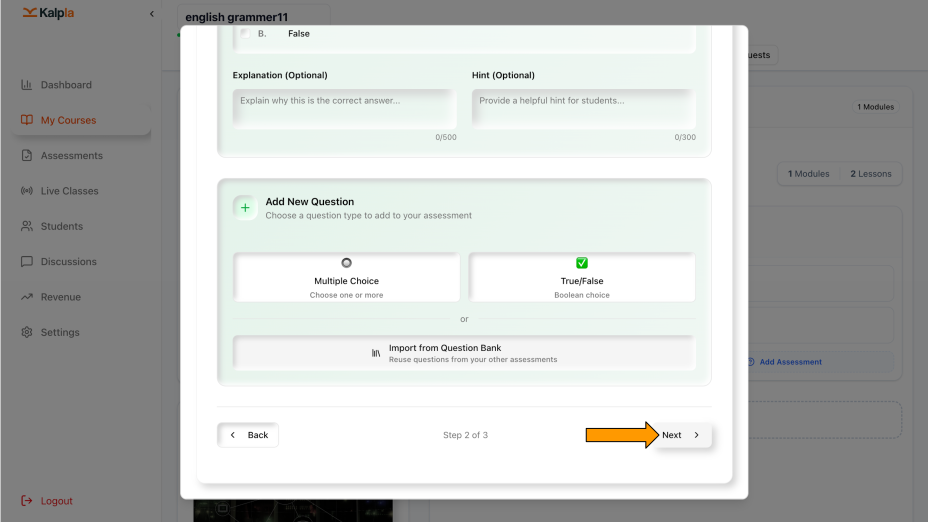
19. Click on Next.
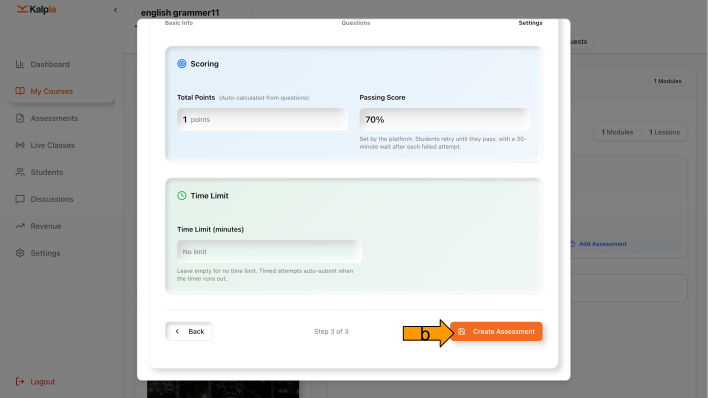
20. Define Assessment Time
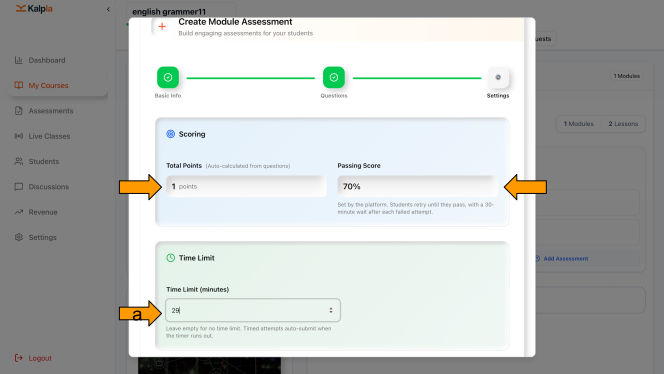
- Then, you will be taken to the Settings page.
- On the Settings page, the total points and passing score will be calculated automatically. Each question is worth 1 point, and the default passing score is 70%.
a. Then, enter a time limit for the assessment
b. Click on Create Assessment.
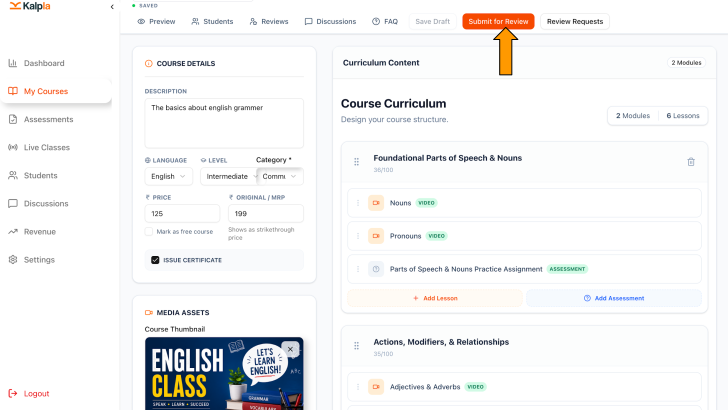
21. Submit Course for Admin Review.
- Once the course curriculum has been created, submit the course for admin review.
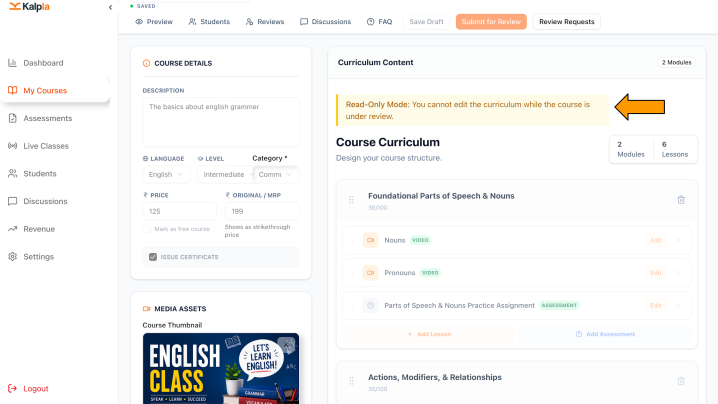
22. Wait for Admin Approval
- After clicking on Submit for Review, your course will be sent to the Admin for review. Once submitted, you will not be able to make any further changes.
23. Review the Changes Requested by Admin
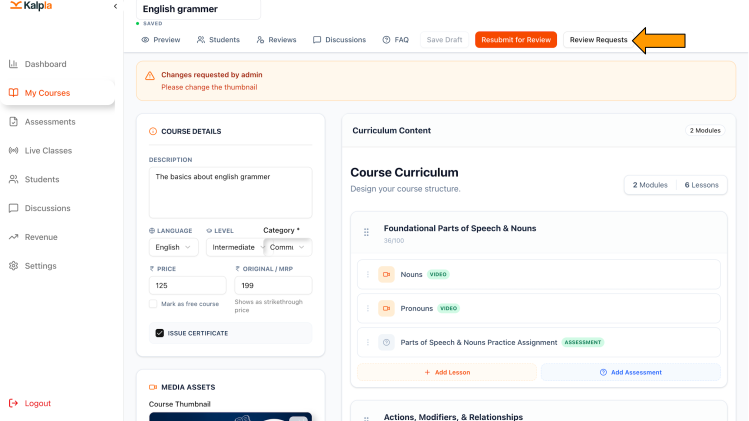
- Once the course has been reviewed by the Admin, if any changes are required, the Admin will send a change request. The requested changes will be displayed on the Course Details page.
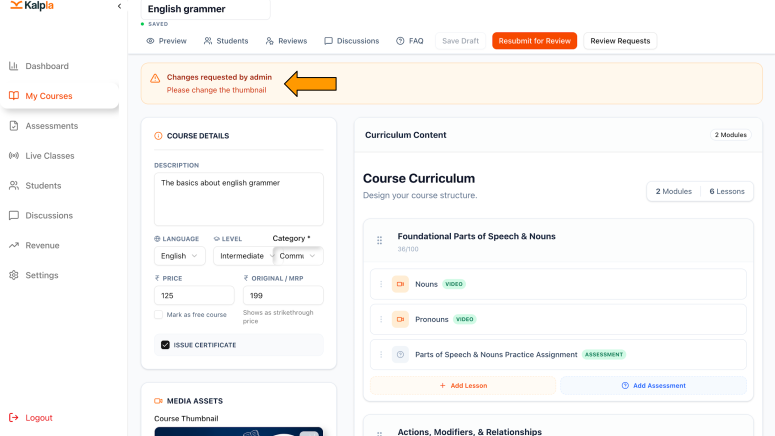
24. Review Admin Comments
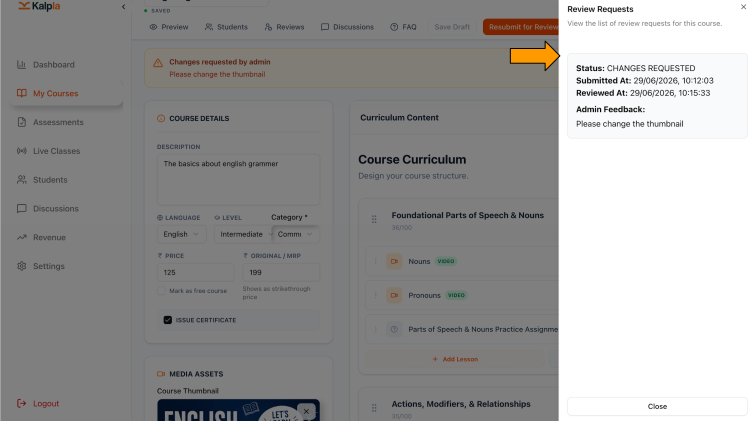
- Click on Review Requests to view the review request message.
25. Resubmit the Course for Approval
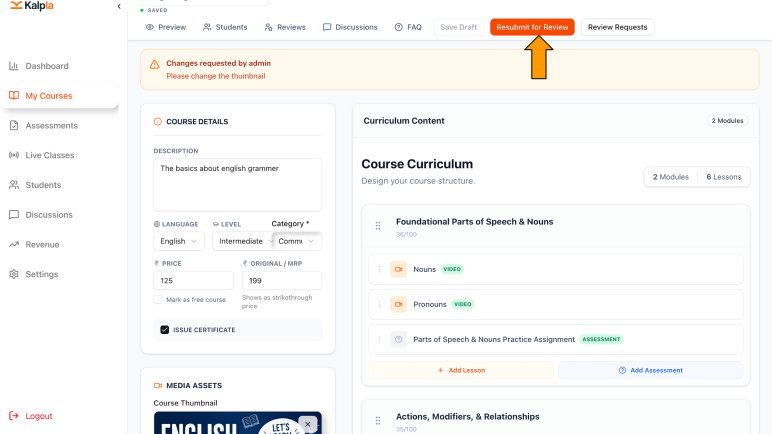
- Once you have made the required changes, click on Resubmit for Review.
26. Course Approved
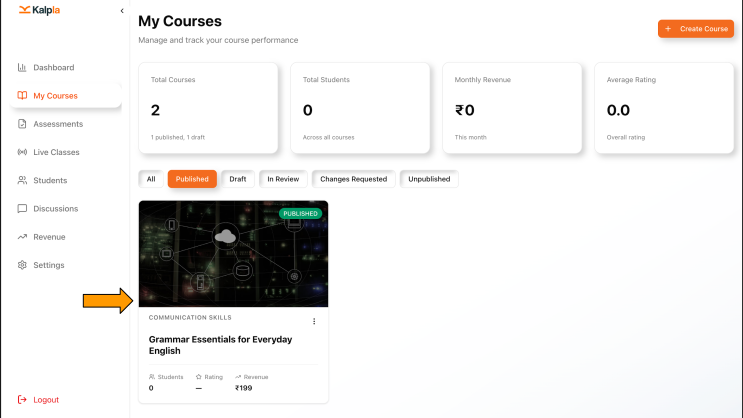
- When the Course is approved by Admin your course will be live on the Kalpla Platform.
Conclusion
Creating and publishing a course enables instructors to deliver structured learning experiences through well-organized modules, lessons, and assessments. By following the course creation workflow and configuring all required course components, instructors can develop high-quality learning content and successfully publish courses for learner enrollment and engagement on the platform.